


Knotting a tie is a complex business. You need to get the right knot for the right occasion. Read on to see how you can master the different types of tie knots.
We have to admit that in this day of advanced technology, certain skills that people were basically required to know have all but been forgotten. Perhaps the best example of this is how to tie a tie. There a wide number of types of ties but you can’t go wrong with knowing the big four.
For instance, did you know that there are eighteen different types of tie knots, at least, and that each is best suited to different occasions or body types? Thankfully, we’ll only be covering a few, so you won’t need a photographic memory to keep up. So, what are these different knots, and what should you know about them? Read on to find out more about men’s tie types.
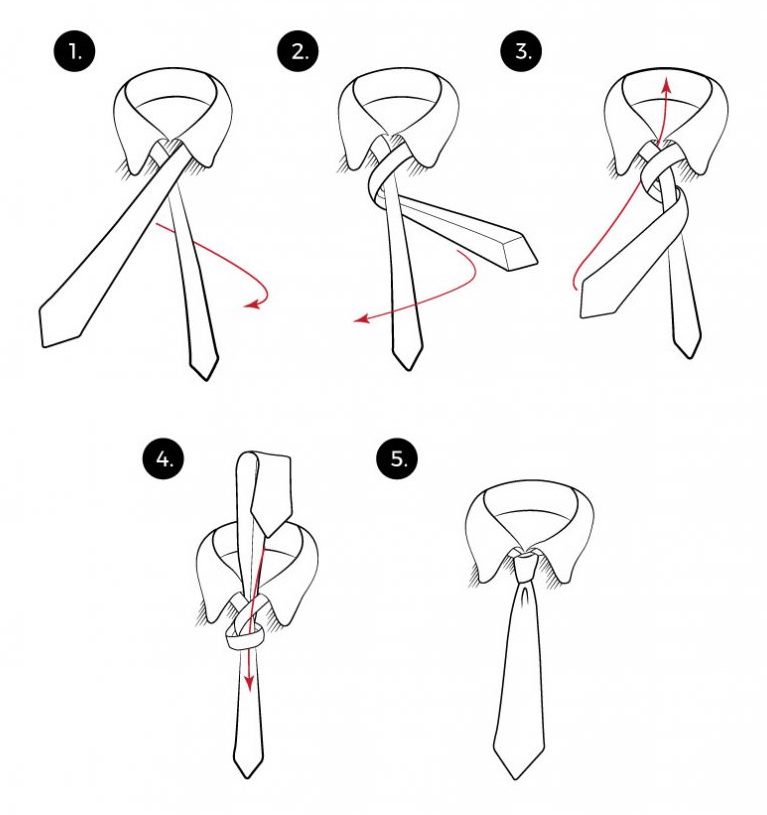
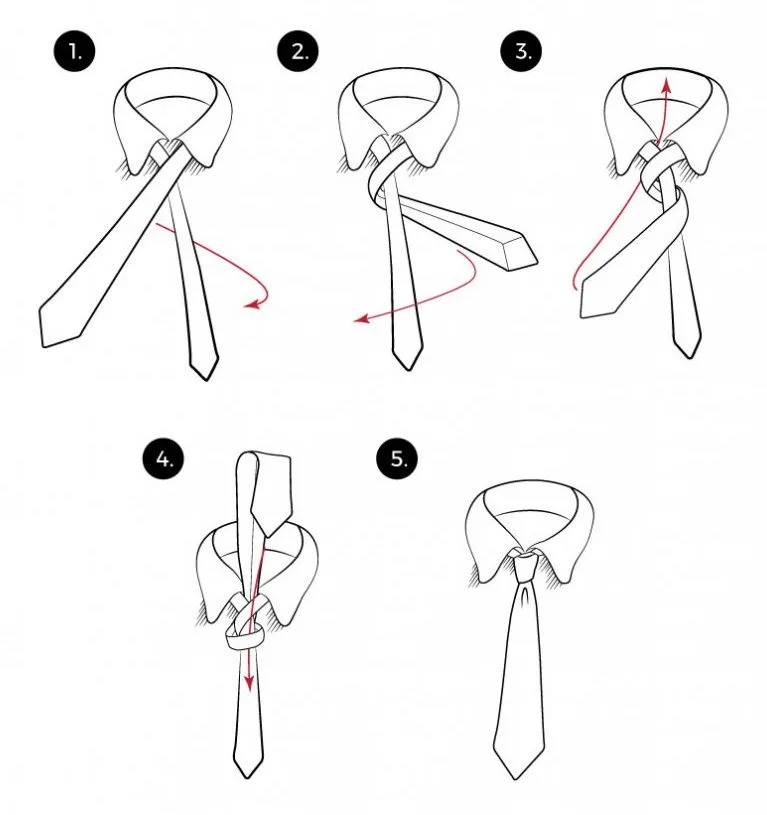
1. Four in hand
The four in hand knot is the most basic knot when it comes to ties, and is highly recommended for beginners.
- To begin, the narrow end of the tie needs to be on your left and the end should come down almost to the middle of stomach. A good measure of this is to make sure the small end ends just above your belly button.
- Wrap the wide end over the narrow the narrow end twice.
- This will form two ‘loops’ on the tie beneath the neck hole.
- Bring the thick end of the tie upwards through the neck hole. Finally, bring the thick end of the tie down and tuck it into the second ‘loop.’
- Pull down on the wide end to tighten the knot. It also helps to pull the knot itself towards your neck while you do this. When you’re finished, the end of the tie should end at your waist or just above.
2. The Windsor Knot
One of the more famous types of tie knots, this knot was named after the Duke of Windsor, who was known for using thicker knots that inspired the Windsor. It is best achieved using a thicker tie. While the Four in hand knot is the easiest to tie, the Windsor is definitely the most versatile and will fit any person for any occasion.
- The starting position for this knot is the same as a four in hand knot, narrow end on the left, ending just above your belly button. Create an X under your chin by placing the wide end of the tie over the slim end.
- The X should have created a loop just around your neck. Bring the wide end upwards through the loop.
- Make sure this new arrangement is tight by pulling down on the wide end as far as it will go without coming undone.
- Loop the wide end of the tie behind this new knot.
- Loop the wide end again, this time diagonally over the front of the knot.
- From this position, pull the wide end down through the neck loop once more.
- Loop the wide end around a third time, this time going left directly across the knot. This will form a small loop around the front of the knot. Remember this for later.
- Bring the wide end through the loop again, this time going upwards. Now, pull the wide end down through that loop we talked about two steps ago.
- Pull the wide end all the way down, and you have successfully tied a Windsor knot. To tighten a Windsor knot, pull down on the slim end while holding the knot.


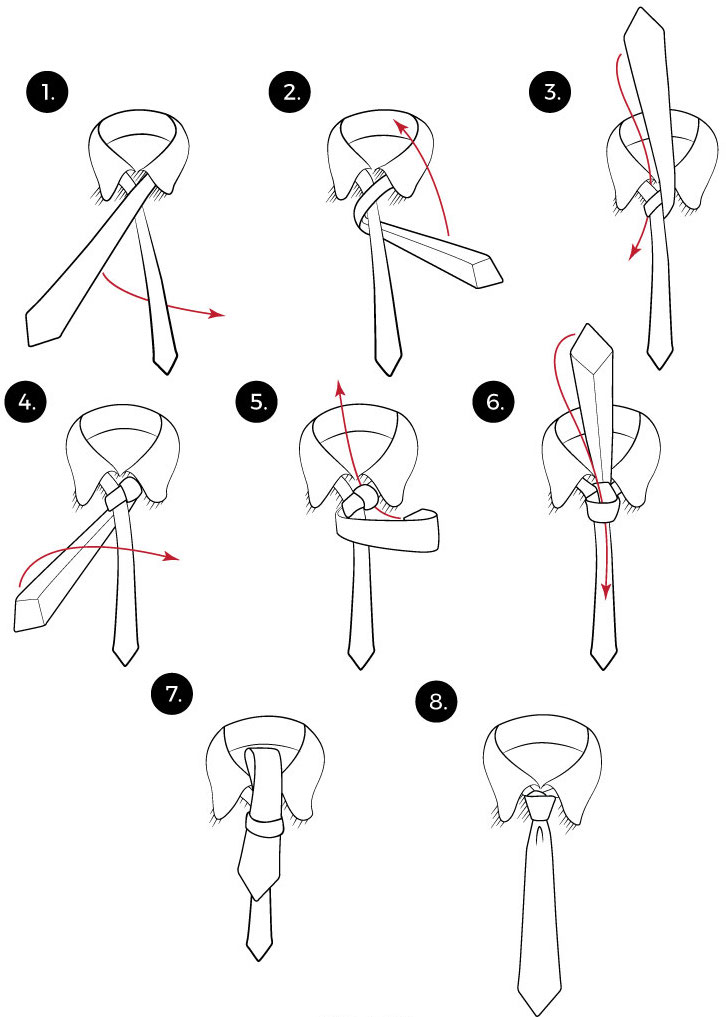
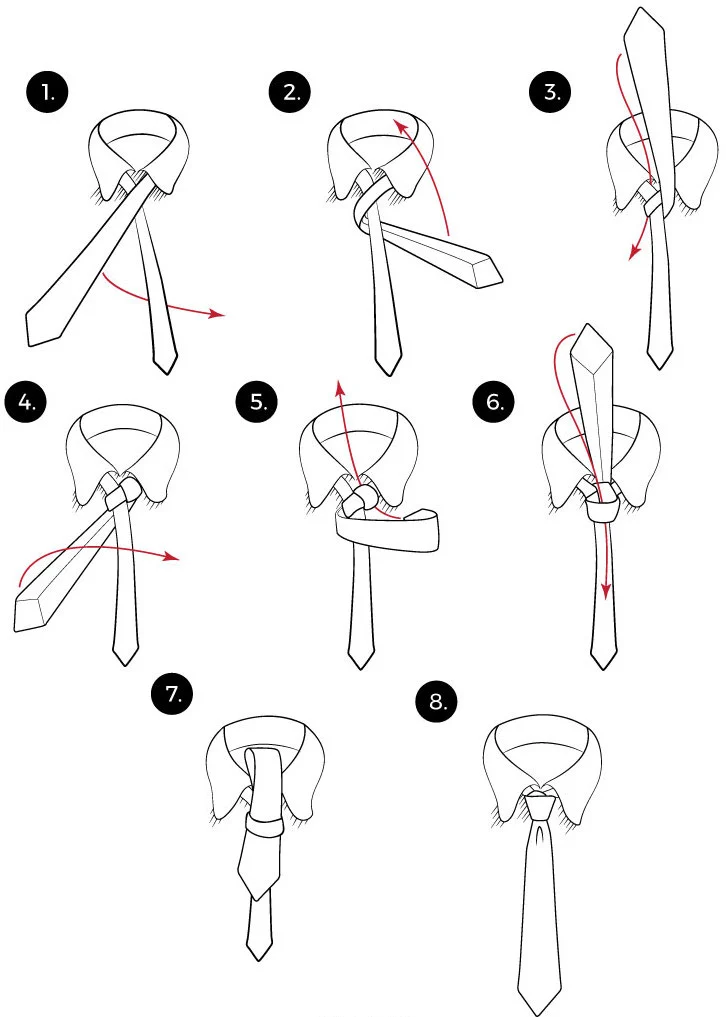
3. Half Windsor
The half Windsor is useful for those with shorter faces or for those who want to look a bit more modest. This is especially noteworthy because the Half Windsor is the most popular knot in the world.
- Like all ties, the Half Windsor starts with the wide end on the right and the slim end on the left just above your belly button.
- Cross the wide end over the narrow end to form an X beneath your chin.
- Loop the wide end of the tie behind the thin end.
- Take the wide end and bring it down through the neck hole.
- Wrap the wide end over the thin end, going left.
- Bring the wide end upwards through the loop. This should create a loop on the front of the tie.
- Bring the wide end of the tie down through the loop mentioned above.
- Pull the wide end down to tighten the knot, and you have successfully tied a Half Windsor
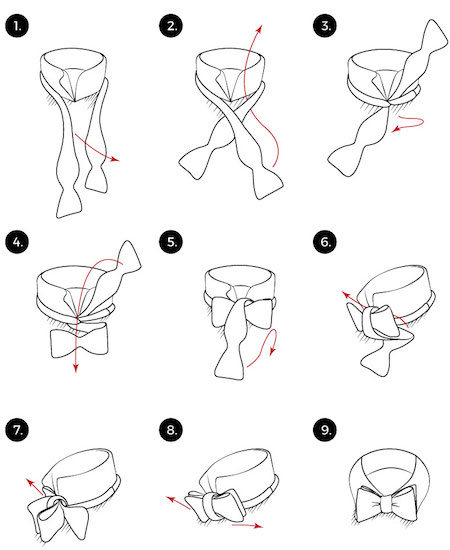
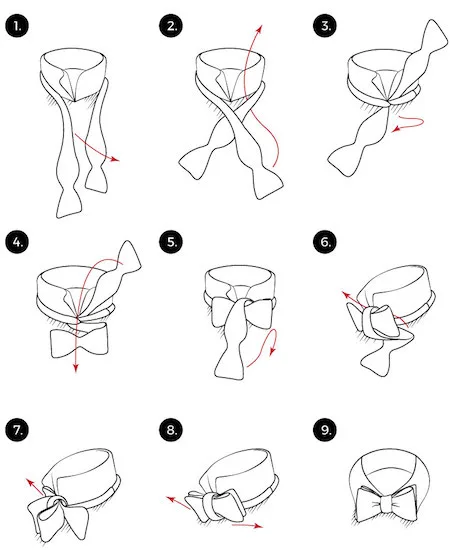
4. Bow Tie
Bow ties types are another category of tie that is easy to tie. They are perfect for formal occasions. Bow ties are perhaps the most interesting of all types of tie knots, because bow ties are symmetrical, with no wide or thin ends. There are a few types of bow ties out there, but the one we outline below is the bread and butter.
- To properly tie a bow tie, start by making the bow tie a few inches longer on the right side. Cross the right end over the left just below the chin.
- Bring the longer end upwards through the loop at the top of the X. Place the longer end on your shoulder.
- Fold the shorter end near your color. Now, you should start to see that distinct bow-tie shape. Bring the long end back to its original place in front of the folded short end.
- Now, fold the long end where the bow tie shape starts. There should be a second loop between the shorter end and the neck loop. Pull the folded side of the longer end through this loop.
- There should be two small loops behind the ‘bows’ of the bow tie. Pull on these to tighten the knot and complete your bow tie.
Types of Tie Knots: An Overview
Tying ties really is an art form, and the many tie styles and types of tie knots are proof of that. The question of what type of men’s tie and knot should you wear comes down to a few factors.
What shape is your head? What occasion are you dressing for? How are you dressing and what you are wearing it with? How much work are you willing to put into tying your tie?


To be on the safe side, it’s best to know all the types of tie knots. A four in the hand is simple and useful with small heads. A full Windsor goes with everything but is more complex. A bow tie is more of a formal tie, and a Half Windsor is less formal or for those with short faces.
If you want more advice on fashion and grooming, please visit our site. We have advice on everything from shaving to skin cream, so feel free to stop by and take a look.